DIY: how to make a clay Flower Frog for flower arranging
If you’re into flower arranging, there’s one little tool that will completely change the game: a flower frog. This clever helper sits on top of a vase or jar and keeps your stems upright. This way, even a small bunch of flowers that would normally flop over will look like a professional arrangement! Flower frogs come in many forms – glass, ceramic, even plastic – but the good news is you can easily make one yourself. In this post, we’ll show you how to create your own clay flower frog.
DIY Clay Flower Frog
A flower frog keeps every single stem right where you want it. By making one yourself, you end up with something completely unique that also fits perfectly with your home decor.
Necessities
- Air-dry clay
- A rolling pin
- A small knife
- A skewer or straw
- Fine sandpaper
- Acrylic paint
- Varnish
- A bowl of water and a sponge
Step-by-step guide
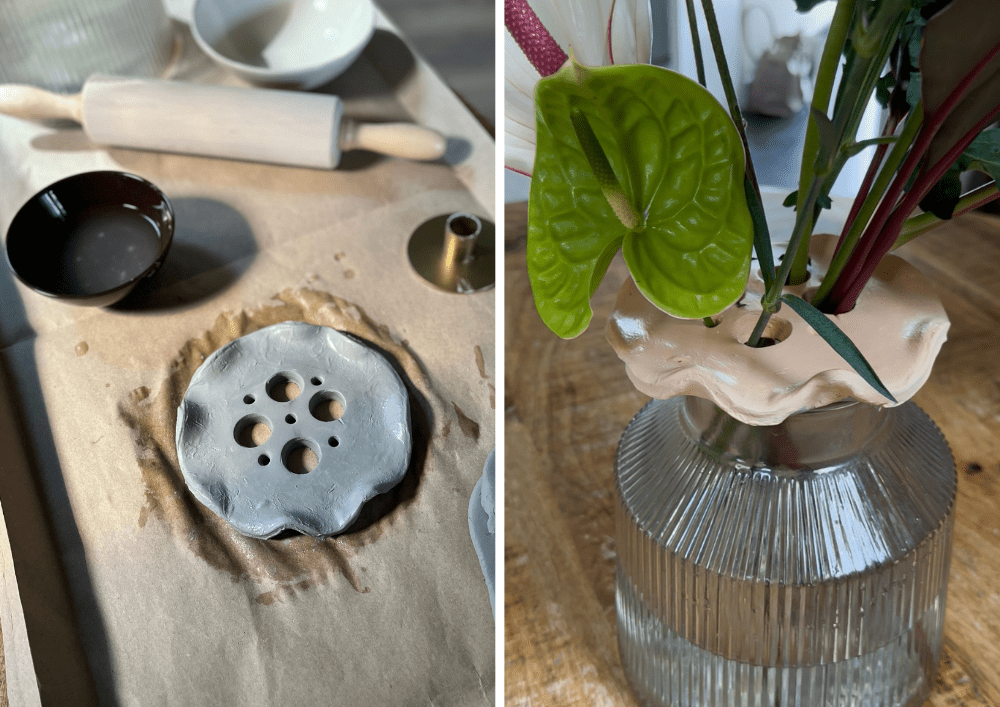
Knead a piece of clay into a firm ball and roll it out with a rolling pin until you have a disc about 2–3 cm thick. Make sure the bottom is completely flat so your flower frog will sit securely on top of a vase or jar. Cut out a neat shape and use a skewer or straw to poke holes into the clay. Be sure to make them wide enough so there’s room for different types of stems.
Smooth the edges with a damp sponge or your fingers, to prevent cracks as it dries. If you’d like, gently press the sides into a wavy shape for a decorative effect. Once you’re happy with the design, leave the flower frog to dry on a flat surface for at least 24–48 hours. Too excited to wait? You can speed up the process by placing it in the oven at 50°C for about 30 minutes.
When the flower frog is completely dry, lightly sand it down to make the surface nice and smooth. Then it’s time to paint! Once the paint has dried and you’re happy with the result, finish it off with a coat of varnish. This not only adds a lovely shine but also helps to protect the surface. Now your flower frog is ready – let the flower arranging begin!
Want to see this DIY in action? Check out this video:
Dit bericht op Instagram bekijken
Also read: Flower arranging made simple: easy steps to beautiful bouquets